
Canva stands as a widely embraced graphic design platform, celebrated for its ability to empower individuals in crafting striking designs with remarkable ease. Among its plethora of functions, one standout feature lies in its capacity to swiftly adapt uploaded images to varying dimensions. This resizing prowess is a testament to Canva’s user-friendliness, catering both to novices and seasoned professionals.
To commence the image resizing journey within Canva, users should commence by pinpointing their chosen image. Once this visual gem is in focus, a mere click upon it, followed by a gentle tap on the “resize” button, initiates the transformation process. From this point forward, users are granted the liberty to manipulate the image’s proportions by deftly manipulating its corners until the desired dimensions are attained. Notably, the option to crop the image is readily available; a simple press of the “crop” button opens the door to selecting the preferred aspect ratio.
In the grand scheme of things, Canva renders the task of resizing an uploaded image an uncomplicated endeavor, requiring only a few strategic clicks. By adhering to the straightforward guidelines elucidated in this exposition, users are well-equipped to adapt their images seamlessly to complement any design they endeavor to bring to life through the versatile canvas of Canva.
Unlocking the Art of Image Resizing in Canva
In the vibrant world of graphic design, resizing an image is a pivotal skill. Whether you’re crafting a captivating social media post, designing an eye-catching flyer, or fine-tuning a presentation, image resizing can be your secret weapon. In the realm of Canva, the versatile graphic design platform, mastering this skill opens up a world of creative possibilities. This comprehensive guide will take you on a journey through the nuances of image resizing, helping you harness its power for your design endeavors. Read our step-by-step guide on how to replace an image in Canva. Unleash your creativity today!
Why Resize Your Images in Canva?
Resizing images in Canva isn’t just about fitting them into your design; it’s about elevating your creative expression. Here’s why you should understand and embrace this essential aspect of graphic design:
- Optimize for Different Platforms: Each social media platform, website, or printed material has unique image size requirements. Resizing ensures your visuals look perfect everywhere;
- Maintain Visual Consistency: Achieve a polished and harmonious look by resizing all your images to the same dimensions within a project;
- Correcting Mistakes: Rectify sizing errors or imperfections in imported images to make them seamlessly blend into your designs.
Resizing Techniques in Canva:
Canva offers multiple approaches to resizing, catering to different design needs:
- Drag and Resize:
- This method allows for easy proportional resizing;
- Simply select the image, grab its corners, and drag to make it larger or smaller;
- Ideal when you want to maintain the image’s original aspect ratio.
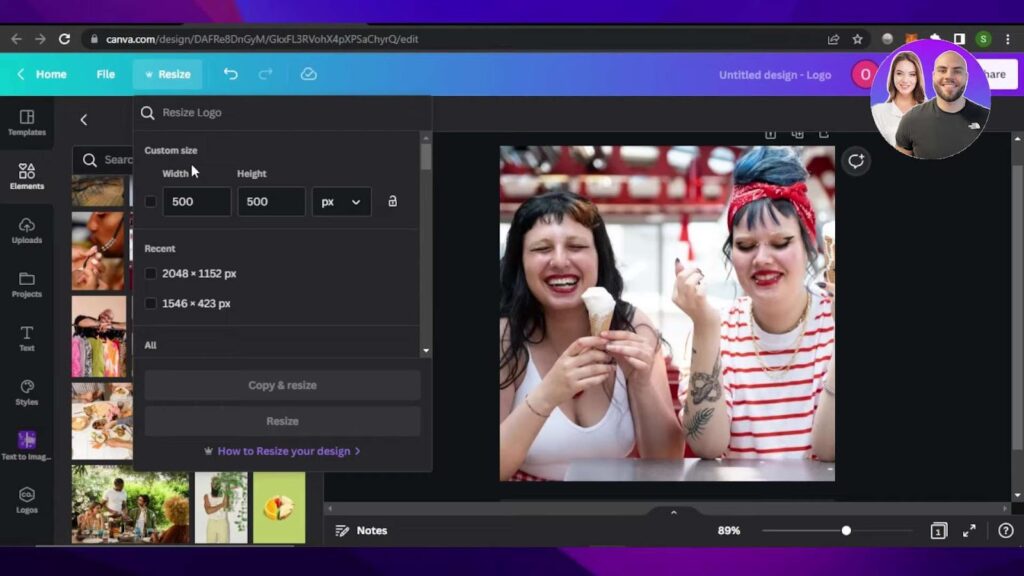
- Using the “Resize” Tool:
- When precise dimensions are crucial, employ the dedicated “Resize” tool;
- Select your image and click on the “Resize” button, unveiling a dialog box;
- Here, you can input specific dimensions, percentages, or custom sizes to achieve your desired outcome.
- Quality Matters:
- A critical aspect of resizing is preserving image quality. Ignoring this can result in pixelation, blurriness, or loss of detail. To ensure your resized images shine:
- Start with High-Quality Images: Begin with images of superior resolution and clarity. It’s challenging to improve the quality of low-resolution pictures, no matter how skillful you are;
- Minimize Resizing: Whenever possible, avoid extreme resizing. The more you alter an image’s dimensions, the greater the risk of quality degradation;
- Use Canva’s “Smart Resize” Feature: Canva offers a handy “Smart Resize” feature that automatically adjusts your design to fit various platforms, minimizing the need for extensive manual resizing.
- A critical aspect of resizing is preserving image quality. Ignoring this can result in pixelation, blurriness, or loss of detail. To ensure your resized images shine:
Exploring Canva’s Versatile Features for Image Resizing
Canva, a popular online design platform, offers a multitude of creative tools and features, and resizing an uploaded image is a breeze. Let’s delve into the step-by-step process to harness Canva’s potential for image manipulation and design:
1. Accessing Canva’s Virtual Realm
To embark on your image resizing journey with Canva, the initial step is to reach the Canva website. Here’s how you can easily get started:
- Open your preferred web browser;
- In the address bar, type “canva.com” and hit enter;
- As you land on the Canva homepage, you’ll find yourself on the threshold of a world of design possibilities. Before diving into the resizing process, you have the choice to either log in to your existing Canva account or embark on a creative journey by creating a new account. Simply click on the “Sign up” button to initiate the registration process if needed.
2. Navigating the Canva Dashboard
Upon successfully logging in, you’ll find yourself on the Canva dashboard. This central hub is where you can manage your previous designs, access templates, and craft new creative projects. To start resizing your image, follow these steps:
- Locate the “Create a design” button situated on the top right-hand corner of the dashboard;
- Click on it to initiate the design creation process.
3. Choosing the Right Canvas
Now, you’ll be presented with an array of design types to choose from. Canva caters to various platforms and dimensions, ensuring your resized image fits perfectly wherever you intend to use it. Select the appropriate design type that matches your resizing needs:
- Explore options like “Instagram post,” “Facebook cover photo,” “YouTube thumbnail,” and many more.
4. Entering the Canva Editor
Once you’ve made your design selection, you’ll seamlessly transition to the Canva editor. Here, you can wield your creative prowess and resize your image flawlessly. To get started with image resizing:
- Click on the “Uploads” tab located on the left-hand side of the editor;
- Then, hit the “Upload media” button.
5. Uploading and Resizing Your Image
You’re now just moments away from resizing your image. Follow these final steps:
- Choose the image you want to resize from your computer, and select it for upload;
- Once uploaded, drag and drop the image onto your canvas;
- Utilize Canva’s user-friendly editing tools to resize your image by clicking and dragging its corners or sides. Keep an eye on the dimensions to ensure accuracy;
- To maintain aspect ratio while resizing, hold down the Shift key.
Mastering Image Uploading in Canva
Welcome to the world of Canva, where your creativity knows no bounds! In this comprehensive guide, we’ll walk you through the art of uploading and resizing images with flair. Whether you’re a seasoned designer or a novice looking to enhance your visual projects, you’re in the right place. Let’s dive in!
Uploading Your Image
- Accessing the Uploads Tab: To embark on your creative journey, start by opening Canva and locating the “Uploads” tab nestled on the left-hand side of your screen;
- Drag and Drop Magic: You have two fantastic options here. You can either effortlessly drag and drop your image file into the designated upload area, or…
- Click to Conquer: If clicking is more your style, fear not! Simply click on the “Upload an image or video” button, and choose the image file you desire from your computer. Canva makes it a breeze to find your artistic assets.
Placing Your Image onto Your Design Canvas
Now that your image is securely uploaded, let’s seamlessly incorporate it into your masterpiece:
- Drag and Drop Wonder: The simplest way is to grab your uploaded image and smoothly glide it onto your design canvas. Your creation will come to life right before your eyes!;
- The Uploads Tab Technique: Alternatively, you can navigate to the “Uploads” tab, select your image, and then click on the “Add to your design” button. It’s all about options and flexibility in Canva.
Know Your Image Formats
Canva is all about versatility, supporting a plethora of image file types to accommodate your creative needs:
- JPEG: Ideal for photographs and images with a wide range of colors;
- PNG: The go-to choice for images with transparent backgrounds;
- GIF: Perfect for short animations or simple, looping graphics;
- SVG: The holy grail of vector graphics, enabling you to scale without loss of quality.
Unlocking the Full Potential of Canva’s Image Editor
When it comes to enhancing your visuals, Canva’s image editor is your creative playground. Whether you’re looking to resize, crop, or add a dash of flair to your images, Canva’s got you covered. In this comprehensive guide, we’ll walk you through the ins and outs of accessing and utilizing this versatile tool.
Accessing the Image Editor
- Open Your Design: To kickstart your image editing journey, begin by opening your design project in Canva. This could be anything from a social media post to a presentation slide;
- Locate Your Image: Identify the image you wish to modify. Sometimes, it might hide behind other elements like text boxes, so ensure it’s easily accessible;
- Initiate Resizing: Click on your chosen image, and voilà – blue arrows magically appear around it. These arrows signify that you’re now in control of resizing. If they don’t appear at first, give the image another click, and they should pop up;
- Pro Tip: Hold down the Shift key while resizing to maintain the image’s aspect ratio, preventing distortion;
- Crop with Precision: Should you want to crop the image instead, it’s a breeze. Click on the image, and a crop button beckons. Upon clicking it, a precise cropping tool emerges. Now, you can drag the edges of this tool to craft your image into the perfect shape and size;
- Handy Hint: Consider using Canva’s predefined aspect ratios for common social media platforms to ensure your visuals are perfectly tailored.
Exploring Canva’s Image Editing Arsenal
Canva’s image editor is not just about resizing and cropping; it’s a treasure trove of creative possibilities. Here’s a glimpse of what you can do:
- Add Filters: Transform your image’s mood with a vast array of filters. From vintage vibes to modern pop, there’s a filter for every occasion;
- Background Removal: Easily remove the background from images to isolate objects or people. This feature comes in handy for creating transparent logos or placing your subjects in different environments;
- Adjust Image Settings: Fine-tune your images with precision. You can control brightness, contrast, saturation, and more to get the exact look you desire;
- Text Overlays: Bring your message to life by adding text to your images. Canva offers a plethora of fonts, styles, and formatting options to help your text blend seamlessly with your visuals;
- Stickers and Elements: Elevate your design with Canva’s extensive library of stickers and design elements. Whether it’s adding an emoji or a decorative flourish, these elements can enhance your image’s impact;
- Shapes and Lines: Precision is key, and Canva provides you with an array of shapes and lines to complement your designs. Use them to create visually appealing compositions or emphasize important elements.
Navigating to the Image Editor
Now that you’re eager to dive into Canva’s image editor, let’s not forget how to access it efficiently:
- Images Tab: To begin editing, select a photo from the “Images” tab. Canva offers a rich collection of stock photos for you to choose from, making it easy to find the perfect image for your project;
- Uploads Folder: If you have your own images, head over to your “Uploads” folder within the “Projects” section. This is where you can access and edit images you’ve uploaded previously.
Image Resizing Made Easy with Canva
Resizing an image in Canva is a breeze, and it opens up a world of creative possibilities. Whether you’re designing social media graphics, posters, or presentations, having the power to manipulate your images effortlessly can take your project to the next level. Here’s a comprehensive guide to resizing images in Canva:
1. Uploading Your Image
Start by uploading your image to the Canva platform. You can either drag and drop the image into your project or use the “Uploads” tab to select it from your computer.
2. Select and Click “Resize”
Once your image is in the workspace, select it by clicking on it. Now, the magic happens. Look for the “Resize” button, typically located in the upper toolbar. Click it to reveal a world of resizing possibilities.
3. The Resizing Options
A pop-up window will appear, showcasing a variety of options for resizing your image. Canva offers flexibility to cater to your specific needs:
- Percentage Scaling: You can adjust the image size by specifying a percentage. This method allows you to scale your image up or down proportionally. It’s perfect when you want to maintain the original aspect ratio;
- Custom Dimensions: If you have precise size requirements, select “Custom Dimensions.” Here, you can input the exact width and height you desire. This is especially handy when you need images for specific print or digital formats.
4. Aspect Ratio Control
Maintaining the aspect ratio of your image is crucial for preserving its visual integrity. Canva has you covered:
Lock and Unlock Aspect Ratio: To maintain the aspect ratio, simply click the lock icon in the resizing window. This ensures that when you adjust one dimension, the other adjusts proportionally. If you need to change the aspect ratio, click the lock icon again to unlock it.
5. Repositioning Your Image
After resizing, you might want to adjust the image’s position within your design. Canva makes this a breeze:
Drag and Drop: Click and hold your resized image, then drag it to the desired location within your design. This allows you to fine-tune the composition.
6. “Fit” Button
For a quick solution, Canva includes a nifty “Fit” button. This feature automatically resizes your image to fit perfectly within your project canvas. It’s a time-saving option for those who want their image seamlessly integrated without the hassle of manual adjustments.
Enhancing Your Images in Canva
In the realm of graphic design, Canva has emerged as a powerful tool for creating visually stunning content. Once you’ve uploaded an image to Canva, you’ll likely want to make it fit your design perfectly. In this section, we’ll delve into the art of resizing, cropping, and optimizing your images for a flawless design experience.
Resizing with Precision
Resizing an image is often the first step in tailoring it to your design needs. Canva offers a simple yet versatile method for resizing images:
- Select your Image: Begin by clicking on the image you wish to resize within your canvas;
- Drag the Resize Handles: At the corners of the selected image, you’ll find handy resize handles. Drag these to elegantly adjust the size, making your image larger or smaller as required;
- Maintain Proportions: Canva’s intuitive system preserves the image’s original aspect ratio, ensuring your content remains visually appealing. However, you can unlock the aspect ratio if needed, granting you full creative control;
- Perfect Alignment: For precise adjustments, use Canva’s alignment guides. These appear as helpful lines when you’re repositioning or resizing elements, ensuring a polished outcome;
- TIP: Keep in mind that constantly resizing an image may lead to a loss of quality. Start with high-quality images whenever possible, and aim for minimal adjustments to maintain the image’s integrity.
Crafting the Perfect Crop
Resizing alone might not be enough to harmonize your image with your design vision. Enter the crop tool, your trusty sidekick for refining composition and focus:
- Select your Image: Click on the image in your canvas that you wish to crop;
- Invoke the Crop Option: Explore the toolbar above your image and find the ‘crop’ function;
- Adjust the Crop Box: A crop box will envelop your image, indicating the area that will remain after cropping. To tailor it precisely, simply drag the edges or corners of the box until it aligns with your design’s requirements;
- Crop Like a Pro: To fine-tune your crop, use the golden rule of thirds, leading lines, or other compositional techniques to create a striking and balanced result;
- Apply the Changes: Once you’ve achieved the desired composition, seal the deal by clicking the checkmark icon in the toolbar. Your image is now expertly cropped;
- PRO TIP: Don’t forget to keep your original image intact. Save a copy before cropping, as you may want to experiment with different compositions or sizes later.
Preserving Image Quality
While the freedom to resize and crop is fantastic, it’s crucial to maintain image quality throughout the process. Here are some tips to ensure your visuals stay sharp and captivating:
- Start with High-Quality Images: The foundation of a great design is a high-resolution image. Always use the best quality source material available;
- Minimal Adjustments: Less is often more when it comes to editing. Make only the necessary adjustments to preserve image clarity;
- Use the Right Format: Ensure your image is in a format that retains quality, such as PNG or JPEG, depending on your needs;
- Monitor Resolution: Pay attention to image resolution, especially if you intend to use your design for print. Canva provides options for adjusting resolution in the export settings;
- Preview Before Finalizing: Before saving or exporting your design, take advantage of Canva’s preview function to ensure your image maintains its integrity at various sizes.
Conclusion
In conclusion, Canva’s popularity as a graphic design platform stems from its remarkable ease of use and a host of features that cater to the needs of both beginners and professionals. Among these features, the ability to resize uploaded images shines as a user-friendly tool. By following the intuitive steps outlined above, users can effortlessly adapt their images to suit their design aspirations. Canva truly stands as a powerful ally in the world of graphic design, ensuring that the creative journey remains accessible and enjoyable for all.