
Canva stands out as a superb tool for graphic design, offering users the simplicity of crafting eye-catching visuals. Among its celebrated functions is the image fade capability, which can elevate a composition by adding layers and enhancing the prominence of text and other design elements. After learning how to fade an image in Canva for a soft and sophisticated touch, the next useful skill to explore is how to flip an image in Canva, which is a straightforward yet crucial technique for adjusting your images to fit the design perfectly.
Various methods exist for achieving an image fade in Canva. Users can adjust the ‘Fade’ control within the ‘Edit Image’ settings or alter the image’s transparency for a similar effect. Alternatively, overlaying a see-through color gradient or using a gradient that transitions to transparency can also produce a delicate fade. These methods empower users to forge captivating designs that capture attention.
For enthusiasts in graphic design, entrepreneurs, or any creative individual, mastering the fading technique in Canva enriches their design toolkit. With these accessible tools and strategies, crafting standout visuals is within anyone’s reach.
What is Canva
This leading design platform stands as a widely embraced tool that equips users to craft visually appealing graphics, ranging from social media graphics to presentations and various printables. As a web-based solution, it provides an extensive array of functionalities and instruments that facilitate the creation of designs that bear a professional quality with minimal effort.
Key Features of Canva
The platform is enriched with features that simplify the design process for its users. Highlights of its capabilities include:
- Design Templates: The platform houses an expansive collection of pre-designed templates suitable for a multitude of design needs, from digital marketing to print media;
- Graphic Elements: Users have access to an extensive repository of graphic elements, including icons, vectors, and illustrations to enhance the visual appeal of their projects;
- Typography Tools: A comprehensive set of typography tools is available, offering users the flexibility to personalize text styles, sizes, hues, and positioning;
- Photo Editing Suite: A suite of photo editing options is provided, enabling users to fine-tune the visual dynamics of their photos, such as brightness, contrast, and saturation;
- Collaborative Functionality: The platform supports collaborative efforts, allowing multiple users to co-create and manage design projects in a shared workspace.
The Role of Image Enhancement in Design
Enhancing images is a key element in the design world, offering a simple and efficient way for designers to refine their work. Tools like Canva provide a user-friendly platform for this purpose. These tools allow adjustments in various aspects like brightness, contrast, and saturation, enabling designers to craft visually stunning and appropriate images for their projects.
Why Image Enhancement Matters
The enhancement of images is pivotal in elevating the quality of a design. It’s not just about tweaking an image’s appearance; it’s about transforming it to align seamlessly with the designer’s vision. This process plays a significant role in making the design not only more attractive but also more coherent with its intended message or theme.
Initiating the image enhancement process in Canva begins with importing the desired image. This can be done in multiple ways. One method involves clicking the “Uploads” button on Canva’s interface, followed by “Upload media”. This option allows for selecting and uploading images directly from a computer.
Alternatively, users can drag and drop images into the Canva editor. This method is straightforward: find the image file on the computer, click and hold it, and drag it into the editor. Once uploaded, the image can be resized and repositioned as needed.
For those who do not have a specific image ready, Canva also offers a rich library of images. Accessing this is as simple as clicking on the “Elements” tab and selecting “Photos”. A search bar is available for users to find and select the ideal image for their design.
Image Fading Techniques for Enhanced Design
Incorporating a faded effect into your images can significantly enhance your design aesthetics. While platforms like Canva offer straightforward methods, understanding the broader concept of image fading across various design tools is beneficial. This involves techniques such as adjusting transparency and creatively using design elements.
Adjusting Image Opacity
One of the fundamental ways to achieve a faded image effect is by manipulating its opacity. Here’s a general guide applicable in most design software:
- Import the image you intend to fade into your design project;
- Select the image within the design interface;
- Locate the image editing features, typically found in a toolbar or menu. Look for an option labeled “Effects” or similar;
- Adjust the opacity of the image using a transparency or opacity slider. Moving the slider to a lower percentage will increase the image’s transparency, creating a faded look.
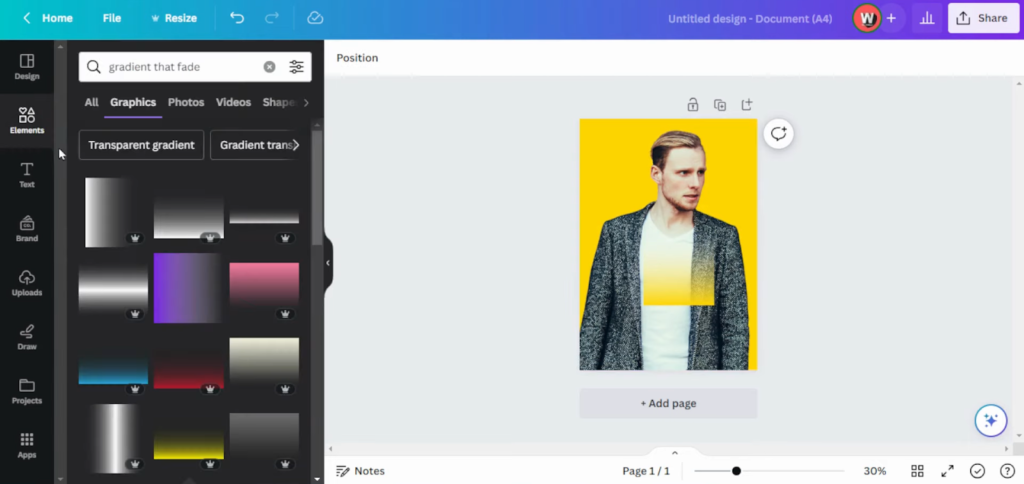
Incorporating Design Elements
Another creative approach is to use design elements like gradients to achieve a fading effect:
- Upload your chosen image to the design platform;
- Access the design elements, often found in a tab or menu titled “Elements” or something similar;
- Search for elements like gradients or semi-transparent overlays;
- Apply the chosen element to your image. This can usually be done by dragging and dropping the element onto your image;
- Resize the element to cover your image as needed;
- Customize the colors and transparency of the element to match your design and achieve the desired fading effect.
Saving and Utilizing Your Faded Image
After applying the fading effect, the next step is to save and export your image. Most design tools offer a variety of file formats like PNG, JPEG, and PDF for saving your work:
- Click on the “Download” or “Export” option, usually located in the upper corner of the workspace;
- Choose your preferred file format from the available options;
- Save the file to your computer or cloud storage.
In case of any difficulties, most platforms provide support or a help guide for troubleshooting.
Once your image is saved, it’s ready for use in various applications, be it digital platforms like websites and social media, or for print purposes. These fading techniques can add a professional and creative touch to your designs, making them more visually appealing and aligned with your project’s aesthetic goals.
Solving Common Image Editing Challenges
When working with graphic design tools like Canva to apply effects like fading to images, users may encounter certain challenges. However, these issues are often solvable with a few troubleshooting techniques. This guide will cover common problems and their solutions, extending beyond Canva to encompass a broader range of graphic design software.
Resolving Image Quality Degradation
A frequent issue when applying effects such as fading is a decrease in image quality, resulting in blurry or pixelated outcomes. Here are some strategies to address this:
- Check Image Resolution: Start by ensuring that your original image is of high quality. Low-resolution images tend to lose clarity when edited. Using images with higher resolution can significantly improve the end result;
- Resize the Image: If the image becomes blurry after applying the fade effect, consider resizing it. Sometimes, reducing the dimensions of the image can lessen the visible blurriness;
- Adjust Opacity Settings: Excessively low opacity settings can make an image appear more pixelated or blurry. Experiment with slightly higher opacity levels to find a balance that maintains the desired faded effect without compromising image clarity.
Troubleshooting Export Issues
Exporting edited images can sometimes present challenges. If you’re facing difficulties in this area, here are a couple of things to check:
- Select the Appropriate File Format: Ensure that you are exporting the image in a format that suits your needs. Common formats include JPEG, PNG, and PDF. Each has its advantages, depending on the intended use of the image (e.g., web, print);
- Consider Image Size: Large images can be problematic to export due to their size. If you’re experiencing delays or failures in exporting, try reducing the image size. This can be particularly effective if the image is intended for web use, where smaller file sizes are often beneficial.

Advanced Techniques for Image Fading
Mastering the art of fading images can significantly elevate your design projects. This skill is not limited to Canva but applies across various graphic design platforms. Here are some refined tips to help you achieve the perfect faded effect, regardless of the software you use:
- Choose the Right Image: The key to successful image fading lies in selecting the appropriate image. Not every picture will complement every fading technique. For instance, images with clear backgrounds are ideal for gradient fading, while those with a distinct focal point are better suited for straightforward opacity adjustments. Always evaluate your image’s compatibility with your intended fading method before beginning;
- Explore Diverse Techniques: Most design tools offer multiple methods to fade images. Don’t hesitate to experiment with various approaches. You might discover that certain techniques are more effective for specific image types or design styles. This exploration can lead to unique and eye-catching results;
- Fine-Tune Opacity Levels: Adjusting the opacity is a straightforward yet powerful way to fade an image. In most design software, you can do this by selecting the image and manipulating the opacity slider. Remember, subtlety is key. A slight change in opacity can dramatically alter the mood and impact of your design;
- Incorporate Gradient Overlays: Adding a gradient overlay is another effective way to achieve a fading effect. Most design platforms provide options to apply pre-set gradients or to customize your own. This technique can add depth and dimension to your images, enhancing the overall aesthetic of your design;
- Utilize Blurring Tools: Some software, similar to Canva’s Blur feature, allows you to fade the edges of an image by applying a blur effect. This method can create a soft, dreamy look, ideal for backgrounds or creating a focal point.
By applying these advanced techniques, you can refine your skills in fading images, irrespective of the design tool you use. Each method offers a unique way to enhance the visual appeal of your designs, making them more professional and aligned with your creative vision.
Conclusion
Learning how to fade an image in Canva can significantly enhance the visual appeal of your designs, making them more professional and eye-catching. With a combination of the right tools and techniques, your designs can effectively convey your message and stand out from the crowd. Canva’s user-friendly interface and broad array of features make it a versatile platform for beginners and seasoned designers alike. Whether you’re creating social media posts, business presentations, or personal projects, mastering image fading in Canva is an invaluable skill that can take your designs to the next level.