
Seeking to substitute an image within Canva? Rest assured, it’s a straightforward procedure achievable with just a few clicks. Whether you’re refreshing an existing design or simply eager to experiment with a different image, Canva offers a seamless means to interchange your visuals effortlessly.
Discovering the Perfect Image Replacement in Canva
Replacing an image in Canva is a breeze, and we’re here to guide you through the process, step by step. Whether you’re working on Canva’s desktop or mobile app, the first essential step is locating the image you wish to swap out. We’ve broken down the process for both platforms to ensure your editing experience is seamless.
For Canva Desktop Users:
- Open Your Design: Fire up Canva’s desktop app and open the design you want to enhance or modify. It’s the canvas upon which you’ll work your creative magic;
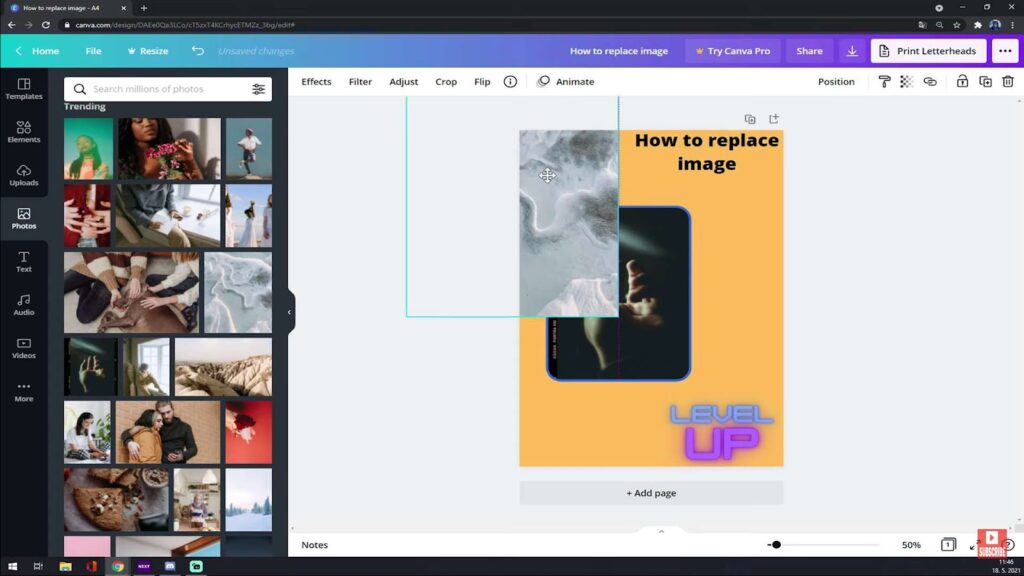
- Locate Your Image: To discover the image that needs replacing, utilize the search bar located at the top of your screen. Type in specific keywords to find the perfect replacement swiftly. Alternatively, if you’ve previously uploaded images, you can access them by clicking on the “Uploads” tab thoughtfully positioned on the left-hand side of your screen;
- Select Your Image: Once you’ve laid eyes on the image that deserves a refresh, simply click on it to select it. Your chosen image will now be adorned with a captivating blue border, instantly grabbing your attention. Simultaneously, a convenient toolbar will materialize at the top of your screen, loaded with creative potential.
For Canva Mobile Enthusiasts:
- Open Your Design: Launch Canva’s mobile app and open the design you’re eager to transform. Your canvas is your playground, and the image you’re targeting awaits your artistic touch;
- Find Your Image: To pinpoint the image that needs a makeover, tap directly on the image itself. This action prompts a toolbar to gracefully glide into view at the bottom of your screen;
- Embrace the “Replace” Button: Right at your fingertips, the “Replace” button beckons, offering you the opportunity to infuse your design with a fresh image. Tap it and embark on your quest to choose a new visual masterpiece to replace the existing one.
Revamping Your Image in Canva: A Comprehensive Guide
Refreshing your design in Canva by replacing an image is an effortless process, encompassing a series of straightforward yet crucial steps. Whether you’re crafting a social media post, a presentation, or a marketing flyer, this guide will walk you through the image replacement process, ensuring your projects always shine.
1. Selecting the Image – The Foundation of Transformation
The first step in this creative journey involves pinpointing the image you wish to replace. Here’s how to do it:
- Click on the image you want to change within your Canva project;
- Look for the “Replace” button that magically appears when the image is selected;
- Click this button, and voila! You’re ready to embark on a visual adventure.
2. Finding a Replacement Image – Your Canvas of Possibilities
Your next task is to locate a replacement image that breathes new life into your project. Whether you’re perusing Canva’s extensive image library or uploading a personal favorite, consider these pointers:
- Quality Matters: Ensure your replacement image is of the highest quality possible. A pixelated or blurry image can detract from your design’s overall impact;
- Relevance is Key: Your replacement image should seamlessly blend with your project’s theme and message. Here’s how to ensure it does;
- Color Harmony: Match the color scheme of your replacement image to your design for a cohesive look;
- Subject Matter: If your original image featured a specific subject, aim for continuity or choose a replacement image that complements it;
- Style Consistency: Maintain a consistent style across your design to enhance visual appeal.
Upgrading Your Design with a Fresh Image
- Picture this: You’re working on your creative project in Canva, and you realize that the current image just isn’t cutting it. It’s time for an upgrade! Here’s how to seamlessly swap out that old image for a new and improved one, injecting a breath of fresh air into your design;
- Selecting the Perfect Replacement: Begin by scouring Canva’s extensive library for the ideal image that suits your vision. Look for high-resolution visuals, relevant to your project’s theme or message. Don’t rush this step; a well-chosen image can elevate your design;
- Click & Insert: Once you’ve found the image that speaks to you, click on it to select it. It’s like finding the missing piece of a puzzle! With your new image in focus, locate the trusty “Insert” button and give it a satisfying click. Voila! Your new image has now stepped into the spotlight;
- Customization Freedom: Now that your new image is in place, it’s time to make it truly your own. Canva grants you the power to resize, reposition, and modify the image to align perfectly with your design’s vision. Here are some invaluable customization options;
- Resize with Precision: Grab the handles surrounding your image and adjust its dimensions proportionally or asymmetrically to fit your layout snugly;
- Position Like a Pro: Click and drag your image to any spot within your canvas. Achieve the perfect composition effortlessly;
- Rotate & Flip: Add a unique twist to your design by rotating or flipping your image horizontally or vertically.
By selecting, inserting, and giving your new image the freedom to adapt, you’re one step closer to a stunning design that captures attention and conveys your message effectively.
Crafting Visual Brilliance with Image Adjustments
So, you’ve seamlessly swapped out the old image for a fresh one – fantastic! But to truly make it shine, you may need to fine-tune and tailor it to your design’s needs. Here’s your toolkit for image perfection:
- Precision Editing: Click on your newly inserted image to reveal an array of editing tools, allowing you to sculpt your image like a digital Michelangelo. Get ready to make your image stand out!;
- Light & Shade Control: Adjust the image’s brightness, contrast, and saturation with ease. This helps you maintain consistency with your design’s overall mood and atmosphere;
- Creative Filters: Explore Canva’s filter library to apply artistic effects, such as vintage, sepia, or grayscale, to infuse a unique style into your project;
- Crop with Precision: If your image has unnecessary elements or doesn’t fit your canvas perfectly, crop it to focus on the essentials. Canva provides cropping options that allow you to select specific aspect ratios for a professional touch;
- Layer & Transparency: Experiment with layering by adding your image above or below other elements. Adjust the image’s transparency to create subtle overlays or captivating visual effects.
By taking advantage of these editing tools, you transform your image from ordinary to extraordinary, ensuring it harmonizes perfectly with your design’s aesthetics and narrative.
Troubleshooting Common Issues: Image Not Loading
Are you experiencing the frustrating issue of an image not loading in Canva? Don’t worry; we’ve got you covered with a comprehensive guide to troubleshoot and resolve this problem. Below, you’ll find a series of steps and tips to help you get those images loading smoothly in your Canva projects.
1. Check Your Internet Connection
A stable internet connection is crucial for smooth image loading in Canva. Here’s what you can do to ensure your connection is up to par:
- Restart your router or modem to refresh the connection.
- Check if other websites and apps are working correctly to confirm it’s not a broader connectivity issue.
- Avoid using public Wi-Fi networks, which can be less reliable.
2. Verify Image Format Compatibility
Canva supports various image formats, including PNG, JPG, and SVG. If your image is in a different format, you may encounter issues. To ensure compatibility:
- Convert your image to a supported format using online converters or image editing software.
- Double-check that your image’s file extension matches the format (e.g., .jpg for JPEG).
3. Clear Browser Cache
Cached data can sometimes interfere with Canva’s image loading process. Follow these steps to clear your browser cache:
- For Google Chrome: Press “Ctrl + Shift + Delete” and select “Cached images and files.”;
- For Mozilla Firefox: Press “Ctrl + Shift + Delete” and choose “Cached Web Content.”;
- For Safari: Go to “Preferences > Privacy,” and click “Remove All Website Data.”
4. Refresh the Page
A simple but effective solution is to refresh the Canva page. Press “Ctrl + R” (Windows) or “Command + R” (Mac) to reload the page and attempt to load the image again.
5. Try a Different Browser
Occasionally, browser-specific issues can affect image loading. If you’re still facing problems, consider switching to a different web browser and see if the issue persists.
6. Clear Cookies
Cookies can also impact Canva’s functionality. To clear cookies:
- In Chrome: Go to “Settings > Privacy and Security > Clear browsing data” and select “Cookies and other site data.”;
- In Firefox: Access “Privacy & Security” in settings, and under “Cookies and Site Data,” click “Clear Data.”
7. Disable Browser Extensions
Sometimes, browser extensions can interfere with Canva’s performance. Temporarily disable all extensions, reload Canva, and check if the image loads correctly.
8. Use Canva’s Desktop App
Consider using Canva’s desktop application for a smoother experience, as it is less reliant on browser-related issues.
Mastering Image Quality in Canva: Troubleshooting Tips
Are your Canva designs suffering from less-than-stellar image quality? Don’t fret; we’ve got you covered with a comprehensive guide to resolve those nagging issues and ensure your creations shine. Let’s dive in!
1. Image Quality and Resolution
Problem: Blurry or pixelated images can ruin the visual appeal of your design.
Solution:
- Ensure your image is of high-quality with a resolution of at least 300 DPI (dots per inch). This ensures crispness and clarity;
- If you’re unsure about the image quality, try sourcing it from reputable stock image websites or use high-resolution images from your own collection.
2. Image Size Matters
Problem: Is your image too large for Canva to handle?
Solution:
- Canva has a maximum image size of 25MB. If your image exceeds this limit, you’ll need to resize it using an image editing tool like Photoshop or Canva’s built-in resizing feature;
- Keep in mind that large images can also slow down your design process, so optimizing image sizes can improve overall performance.
3. The Right File Format
Problem: Your image may not be displaying correctly due to an incompatible file format.
Solution:
- Canva recommends using PNG or JPG files for the best image quality and compatibility;
- If you’re working with other formats like GIF or BMP, consider converting them to PNG or JPG before importing them into Canva.
4. Additional Tips
- Color Mode: Ensure your images are in RGB color mode for web-based designs and CMYK for print. This can affect the color accuracy in your designs;
- Background Removal: If your image contains a complex background, use Canva’s background remover tool to isolate the subject and create a cleaner design;
- File Size: While Canva allows for large images, it’s a good practice to optimize your images for web use to improve loading times and overall design performance;
- Mobile Compatibility: If your designs are intended for mobile devices, consider checking your images on various screen sizes and resolutions to ensure they appear as intended.
Also, discover the art of perfecting Fiverr gig image size: Boost your gig’s appeal with expert size recommendations for maximum impact!
Conclusion
Substituting an image within Canva proves to be a simple and uncomplicated endeavor. You are afforded the choice between two options: “Elements” and “Uploads,” allowing you to access the desired replacement image. Once you possess the new image, effortlessly place it by executing a drag-and-drop action over the existing image within your design. If the need arises to replace all logos or images across numerous designs simultaneously, merely opt for “Replace image across designs” and designate the designs earmarked for modification.
It merits emphasis that, during the image replacement process, utmost attention should be given to ensuring that the incoming image matches the dimensions and resolution of its predecessor. This judicious measure guarantees the consistency and professionalism of your design output. In instances where an image format conversion becomes necessary, Canva provides a valuable solution with its Image Converter tool, facilitating the transformation of JPG, PNG, or PDF files into SVG (Scalable Vector Graphics) format.